
A family oral history archive is a structured collection of recorded interviews, transcripts, and supporting materials that preserves your relatives' stories in their own voices. These archives capture what written records never can: the rhythm of a grandmother's speech, the emotion behind a war story, the humor in a childhood memory. The American Folklife Center at the Library of Congress has championed oral history as a primary method for preserving cultural memory for decades. When you create a family oral history archive, you give future generations direct access to the people who shaped them, not just dates and names on a family tree.
How to create a family oral history archive: planning your project
Every successful oral history project starts with a clear scope. Decide whether your archive is for private family use, a shared online portal, or eventual donation to a public institution like a local historical society. That decision shapes everything from your equipment choices to how you handle consent.
Identifying your narrators is the next step. Prioritize elders first. Memories vanish when senior family members pass away, and no amount of future technology recovers a story that was never recorded. Start with the oldest relatives and work outward from there.
Consent is not optional. Clarify project scope, ownership, storage, and access with every narrator before you press record. That conversation builds trust and protects everyone. A simple written agreement covering who can listen to the recordings, where they will be stored, and whether they can be shared publicly is enough for most family projects.
Before your first session, gather your tools:
- A smartphone or dedicated digital recorder (both work well in quiet rooms)
- A free or low-cost transcription app for post-recording processing
- A cloud storage account with a folder structure ready to go
- A consent form template you can adapt for each narrator
- A list of 10–15 prepared interview questions
Pro Tip: Write your questions in advance, but treat them as a starting point. The best moments in oral history interviews come from following an unexpected thread, not sticking to a script.
What makes a high-quality oral history recording?
Recording quality comes down to environment and technique, not expensive equipment. A quiet room with soft furnishings absorbs echo and background noise better than a hard-walled kitchen. Smartphones and digital recorders produce audio suitable for archiving when used correctly. The device matters far less than where you place it.
Follow this sequence for every session:
- Choose a quiet, comfortable space the narrator knows well. Their home is ideal.
- Place your recording device 12–18 inches from the narrator, not between you.
- Open every recording with a verbal identification: name, date, location, and the interviewer's name.
- Start with broad, low-pressure questions about grandparents or the earliest family memories the narrator can recall.
- Let silences breathe. Narrators often fill pauses with the most revealing details.
- Aim for 10–20-minute sessions initially, especially with older relatives who tire easily.
Broad opening questions reduce self-consciousness and produce richer stories than narrow, direct questions. Asking "What do you remember about your grandmother's kitchen?" unlocks more than "Tell me about your childhood." The indirect approach works because it shifts focus away from the narrator's performance and onto a memory they already hold vividly.
Pro Tip: Record a 30-second test clip before the real interview starts. Play it back to check audio levels and catch any hum from appliances or HVAC systems you can then switch off.
Treat every narrator as a collaborator, not a subject. That shift in posture changes the entire dynamic of the conversation. When narrators feel like partners in a shared project, they open up faster and stay engaged longer. For more on voice recording techniques that put narrators at ease, the approach transfers directly from professional oral historians to family settings.
How do you organize and preserve oral history recordings?
Organization is where most family archives fail. Recordings pile up in a downloads folder, file names become meaningless, and within a year nobody can find the interview with Uncle Harold from thanksgiving. A consistent file naming convention prevents this entirely.
File formats and metadata
WAV files preserve the highest audio quality and are the archival standard. MP3 files are smaller and still acceptable for long-term storage. Choose one format and apply it consistently across your entire collection.
Metadata is what makes an archive searchable rather than just stored. Embed tags and use JSON sidecar files to capture the narrator's full name, date of recording, location, topics covered, and rights and consent information. A sidecar file sits alongside the audio file and holds all this context in a format that survives software changes over decades.
| Metadata field | What to include |
|---|---|
| File title | Narrator last name, first name, date (YYYYMMDD) |
| Participants | Narrator name, interviewer name |
| Location | City, state, specific place if relevant |
| Topics | 3–5 keyword tags summarizing the conversation |
| Rights | Consent status, sharing permissions, storage location |
Transcription and backup
Transcripts improve accessibility for family members with hearing challenges and make the archive searchable by keyword. Use an AI transcription tool for a first pass, then review the output manually for names, places, and dialect-specific words that automated tools consistently misread.
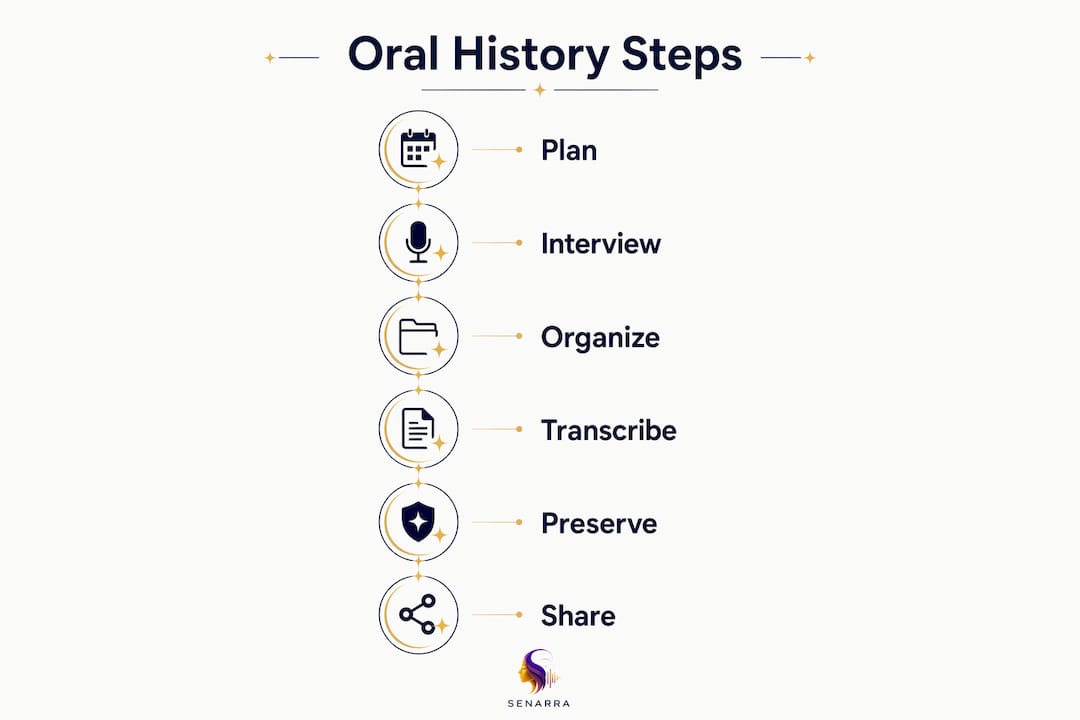
The 3-2-1 backup rule protects your archive against loss: keep 3 copies of every file, on 2 different types of media, with 1 copy stored offsite. In practice, that means a copy on your computer, a copy on an external hard drive, and a copy in cloud storage. A clear preservation workflow keeps this manageable: record today, copy to an external drive within 24 hours, generate a transcript within a week, and add metadata before you move to the next interview.
For a broader look at family history preservation methods that complement audio archiving, combining physical documents with digital recordings creates the most complete picture.
How do you share your family oral history with relatives?
A finished archive that nobody accesses is a missed opportunity. Sharing oral histories multiplies their impact and turns a static file collection into a living part of family culture. The goal is to make the stories easy to find, easy to listen to, and easy to contribute to.
Practical sharing options include:
- A private cloud folder (Google Drive or iCloud) with organized subfolders by narrator or decade
- A family website with password protection and embedded audio players
- Printed memory books that combine transcripts, photographs, and curated highlights
- Audiobook-style compilations for long car rides or family gatherings
- QR codes printed in photo albums that link directly to the corresponding audio recording
Printed memory books combining transcripts and photos make archives accessible to relatives who are not comfortable with technology. A printed book on a coffee table gets picked up. A folder in cloud storage does not.
Plan at least one annual listening session, ideally around a family reunion or holiday gathering. Play a short clip, invite reactions, and ask who else has a story connected to what they just heard. That format turns passive listeners into active contributors. The archive grows because people feel part of it, not just recipients of it.
Encourage younger family members to conduct interviews with older relatives. A teenager interviewing a great-grandparent creates a connection that no other family activity replicates. The urgency of capturing aging parents' memories before they fade is real, and younger family members often bring a natural curiosity that elders respond to warmly.
Key Takeaways
A family oral history archive succeeds when it combines ethical planning, quality recording, consistent metadata, and active sharing to keep stories alive across generations.
| Point | Details |
|---|---|
| Start with elders | Prioritize the oldest narrators first, since their memories are most at risk of being lost. |
| Consent before recording | Clarify ownership, storage, and sharing rights with every narrator before the first session. |
| Use the 3-2-1 backup rule | Keep 3 copies on 2 media types with 1 offsite to protect against data loss. |
| Metadata makes archives searchable | Embed file tags and use sidecar files with names, dates, topics, and consent details. |
| Share actively | Use printed books, QR codes, and listening sessions to turn the archive into a living family resource. |
What I've learned from building family oral history archives
The biggest mistake families make is waiting for the perfect moment. There is no perfect moment. There is only the conversation you have today versus the one you never get to have. I have seen families lose irreplaceable stories because they assumed there would be more time. The recording you make on a smartphone in a slightly noisy kitchen is infinitely more valuable than the perfect studio recording you never made.
The second thing I have learned is that narrators need to feel like partners, not interview subjects. The moment someone senses they are being documented rather than heard, they become guarded. The best oral history interviews feel like good conversations. You are genuinely curious. You follow threads. You laugh when something is funny. That energy is what makes recordings worth listening to decades later.
Metadata is the unglamorous work that nobody wants to do and everybody regrets skipping. I have spent hours trying to identify recordings with no date, no location, and a file name like "audio_003.mp3." Label everything immediately after recording. Future you will be grateful.
Finally, do not let the archive become your project alone. Invite cousins to conduct interviews. Ask teenagers to help with transcription. Share a clip at every family gathering. The archive stays alive when the whole family feels ownership over it. That is the difference between a folder of files and a genuine family legacy.
— Bryan
Senarra and your family's oral history
Families who want a purpose-built tool for recording, transcribing, and preserving stories will find Senarra worth exploring. Senarra captures conversations in the narrator's authentic voice and uses AI to make those recordings searchable and accessible long after the original session.
Senarra's privacy controls keep recordings secure, and its memory line feature lets family members connect with preserved voices by phone, not just through a screen. For families building a lasting voice memory collection, Senarra handles the technical side so you can focus on the conversations that matter. Visit Senarra to see how it fits into your family's preservation plan.
FAQ
What is a family oral history archive?
A family oral history archive is a structured collection of recorded interviews, transcripts, and metadata that preserves relatives' stories in their own voices for future generations.
How do I start recording family oral histories?
Start by identifying your oldest relatives, obtaining their consent, and recording a 10–20 minute conversation in a quiet room using a smartphone or digital recorder.
What file format is best for oral history preservation?
WAV is the archival standard for audio quality. MP3 is an acceptable alternative for smaller file sizes. Choose one format and apply it consistently across your entire archive.
How do I keep family oral history recordings safe?
Follow the 3-2-1 backup rule: keep 3 copies of every file on 2 different media types, with 1 copy stored offsite in cloud storage or at a separate physical location.
How can Senarra help with family oral history documentation?
Senarra records conversations in authentic voices, provides AI-powered transcription, and offers secure cloud storage, making it a practical tool for families building a searchable, long-term oral history archive.