A moving memorial slideshow comes down to five decisions: theme, photo selection, pacing, music, and testing before the service. Get those right, and everything else follows.
Here is the short action plan:
- Choose a structure (chronological, theme-based, or hybrid) and pick dozens of photos.
- Set pacing at 3–7 seconds per photo, export as MP4, and add 1–3 songs.
- Test on venue equipment at least 24 hours before the service, and bring a USB backup.
The next sections walk through each decision in detail, from creative concepts to the final checklist.
Key Takeaways
A well-built memorial slideshow comes down to five decisions: structure, photo count, pacing, music, and testing on venue equipment before the service.
| Point | Details |
|---|---|
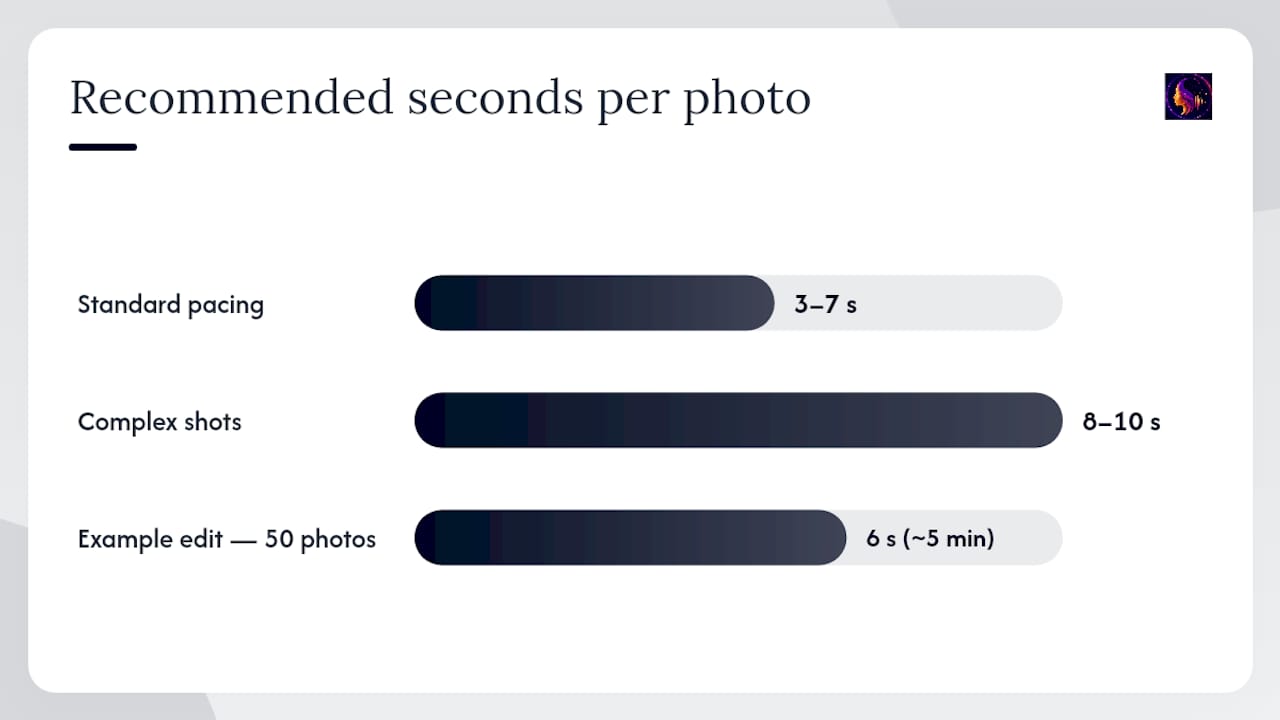
| Set pacing at 3–7 seconds | Use 8–10 seconds for complex group shots; 50 photos at 6s runs approximately 5 minutes. |
| Limit photos for runtime | 50 to 100 photos at 5–7 seconds per image covers both scenarios comfortably. |
| Use 1–3 songs | One song fits a short service edit; two to three songs create natural chapters for longer tributes. |
| Test on venue equipment | Play the full video on the actual projector or screen at least 24 hours before the service. |
| Senarra for voice preservation | Senarra captures guided conversations and voicemails families can integrate directly into tribute slideshows. |
What are the best memorial slideshow ideas for a tribute?
Families often know they want something meaningful but struggle to find a starting point. These ten concepts give you a clear direction to build from.
- Life timeline. Open with a recent portrait, move chronologically through childhood, milestones, and later life, and close with a second hero portrait. A hybrid chronological structure carries emotional weight for attendees across generations.
- Theme-based tribute. Organize photos around a defining passion: travel, faith, gardening, music, or career. One strong theme creates a cohesive story even when photos span decades.
- Short service edit. A single song, 30–60 images, and a clean closing card. This format fits a 5–7 minute window during a service without rushing.
- Reception loop. A longer version, 80–120 images, set to 2–3 songs and looped on a screen during the gathering. Guests can watch at their own pace.
- Audio-anchored slideshow. Intersperse short voice clips or video moments between photo sequences. Hearing the person's actual voice, even briefly, shifts the entire emotional register of the tribute.
- Passion spotlight. Pull every photo connected to one interest and build a tight 2–3 minute sequence around it. Works especially well for someone whose identity was tied to a sport, instrument, or craft.
- Generational montage. Show the person's impact across family and friends: grandchildren, colleagues, neighbors. Useful for anniversaries or milestone memorial services.
- Places and objects. Homes, gardens, a favorite chair, a well-worn tool. These images often surface memories that portraits alone cannot.
- Candid and funny mix. A short sequence of lighter moments can ease the grief in the room. Keep it brief and place it in the middle, not at the end.
- Documentary mini. Short text captions, a few interview clips, and a narrated arc. This takes more time to produce but creates a keepsake families return to for years.
Pro Tip: Create two versions from the start: a tight service edit and a longer family archive. The service edit keeps things moving; the archive gives family members something to revisit privately.
How many photos do you need, and how long should it run?
Pacing is where most DIY slideshows go wrong. Too fast, and the images blur past. Too slow, and the room grows restless.
The professional baseline is 3–7 seconds per photo, with 8–10 seconds reserved for emotionally complex images or large group shots where faces need time to register. Those numbers translate directly into runtime.
For a service, 5–10 minutes is the practical target. A reception loop can run 10–12 minutes before repeating. Fifty to 100 photos at 5–7 seconds per image covers both scenarios comfortably.
Song count follows runtime. One song works well for a short service edit. For a 7–12 minute slideshow, two to three songs let you create natural chapters: an opening, a middle sequence, and a closing. Changing the global transition duration in your editing tool shifts every slide simultaneously, so adjust that setting first before fine-tuning individual slides.
Stat to know: At 6 seconds per photo, 50 images runs approximately 5 minutes. Add transitions (typically 1 second each), and that same set lands closer to 5.5–6 minutes. Factor transitions into your count.
How do you choose and prepare photos for a memorial slideshow?
Photo selection is the most time-consuming part of the process, and the most important. The goal is a set of images that tells a life story, not just a collection of the best-looking shots.
What to include:
- Milestones: graduations, weddings, births, retirements.
- Candid moments: laughing at a table, working in the yard, holding a grandchild.
- Relationships: photos with the people who will be in the room.
- Signature places: the family home, a favorite vacation spot, a workplace.
- Hobbies and interests: anything that defined how they spent their time.
Avoid clinical or illness-related images unless the family specifically wants them included. The slideshow should reflect the person at their fullest.
Gathering photos from family:
Ask each contributor for their top 3–5 images rather than everything they have. This approach reduces overload and yields better coverage across life chapters than an open call. Create labeled folders by era or theme (1970s childhood, career years, grandchildren) and name files with short captions so you can find them quickly during editing.
Preparing low-quality images:
Old photos often need work before they look good on a projected screen. Scan at 600 DPI minimum, crop tightly to faces when the background is distracting, and use a basic tool like Google Photos, Snapseed, or Adobe Lightroom to adjust brightness and contrast. Minor scratches can be repaired in Photoshop or the free alternative GIMP. You do not need a perfect image; you need a legible one.
Pro Tip: Open with a recent, well-lit portrait. Attendees need to immediately recognize the person, especially those who knew them decades ago. A strong opening image sets the emotional tone for everything that follows.
How do you choose music and add voice clips to a memorial slideshow?
Music carries the emotional weight of a tribute video more than any other element. The right song can hold a room together; the wrong one can feel jarring.
Choosing songs:
- Use 1–3 songs depending on runtime, as noted above.
- Prioritize the person's actual favorites when you know them. A song they loved lands differently than a generic "memorial" track.
- Instrumental tracks reduce the risk of lyrics pulling attention away from the images. Use lyrical songs only when the words clearly fit the story.
Mixing audio levels:
Fade music in at the start and out at the end rather than cutting abruptly. If you include voice clips, set them 3–5 dB louder than the music bed so speech stays audible. Keep overall levels consistent throughout; a sudden volume jump in the middle of a service is distracting.
Adding voice recordings:
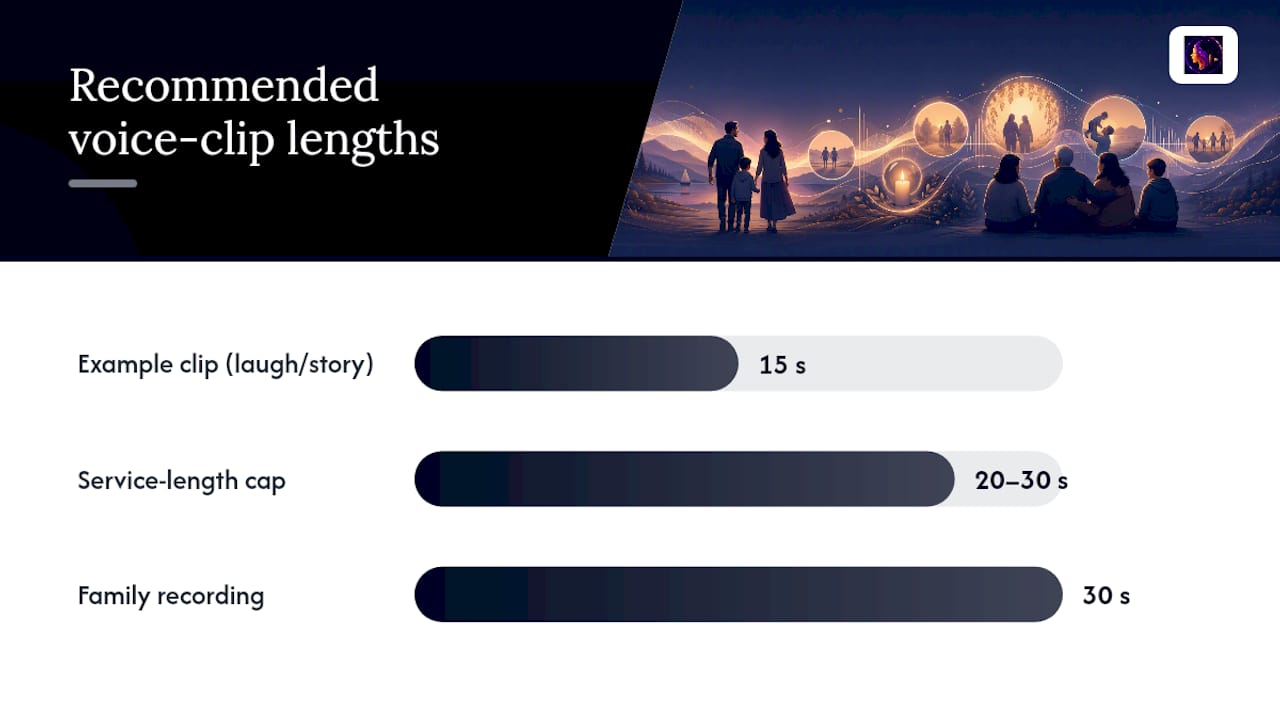
Including the deceased's recorded voice, whether from a voicemail, a home video, or a recorded interview, transforms a slideshow into an intimate experience. Place voice clips at chapter anchors: the opening, a transition between eras, or just before the closing hero portrait. Keep individual clips under 20–30 seconds. Longer clips work in a documentary format but can slow a service-length edit.
Copyright and online sharing:
Venues often hold blanket performance licenses that cover music played during a service. Online sharing is a different matter. Copyright Content ID systems on platforms like YouTube and Facebook can mute or flag videos that use copyrighted tracks. If you plan to share the video online, use royalty-free libraries such as the YouTube Audio Library, Epidemic Sound, or Artlist. You can also post as an unlisted link to limit exposure.
Pro Tip: Record a short voice note from a family member as a closing narration. Even 15 seconds of a sibling or child saying a few words over the final image adds a layer of intimacy no music track can replicate. For capturing and preserving those recordings, audio memory preservation tools make the process straightforward.
Which tools and templates should you use for a funeral slideshow?
The right tool depends on how much time you have and how comfortable you are with video editing. Every option below can produce a dignified, service-ready result.
Quick tools (minimal learning curve):
- Google Photos automatically generates slideshows from albums and exports them as video files. Good for a fast, simple tribute with no design decisions required.
- PowerPoint or Keynote are familiar to most people and export directly to video. Set slide duration manually, add a music track, and export as MP4.
Template-based tools (best for most families):
- Canva offers memorial and tribute templates with soft transitions. Drag-and-drop editing, cloud storage, and direct video export make it accessible for non-designers.
- Adobe Express provides polished templates and straightforward controls. The free tier covers most memorial slideshow needs.
- Animoto is built specifically for video slideshows and includes memorial templates with gentle Ken Burns pan effects and soft fades. It handles music syncing automatically.
Advanced editors (more control, steeper learning curve):
- iMovie (Apple devices) gives you precise control over timing, transitions, and audio mixing without a subscription fee.
- Movavi runs on both Mac and Windows and sits between consumer and professional tools. It handles multi-track audio well, which matters when you are mixing music and voice clips.
For templates, search within each platform for "memorial" or "tribute" labels. Soft crossfades and slow pans keep the focus on the images. Avoid star wipes, rapid zooms, or anything that reads as celebratory.
Export and playback:
MP4 at 1080p using H.264 encoding is the safest format for venue playback and online sharing. Bring the file on a USB drive and keep the editable project file on your laptop. Confirm the venue's preferred file format and connection type (HDMI, USB, or streaming) at least 48 hours before the service. For distant family, an unlisted YouTube or Vimeo link lets them watch without the file being publicly searchable.
For a broader look at digital memory keepsake formats, including audio archives and memory books, there are options beyond the slideshow itself.
Pro Tip: Export a compressed version (720p) alongside your 1080p file. Some older venue projectors or USB players handle smaller files more reliably, and having both takes 30 seconds.
What is the step-by-step workflow to make a memorial video?
A focused DIY memorial video typically takes 3–8 hours to edit, and collecting photos from family usually takes longer than the editing itself. Build your timeline around that reality.
Step-by-step process:
- Choose your structure and music. Decide on chronological, theme-based, or hybrid. Select 1–3 songs and confirm they fit the tone.
- Set a contributor deadline. Give family members a firm cutoff, at least 48 hours before you need to start editing. Ask for top 3–5 photos per person, labeled and organized by era.
- Sort and prepare photos. Create folders, crop and adjust images, and build a rough sequence in your chosen tool.
- Edit pacing and transitions. Set global slide duration first (5–6 seconds is a reliable default), then adjust individual slides for complex images. Add soft crossfades throughout.
- Add titles, quotes, and voice clips. Insert an opening title card, chapter headers if needed, and any voice recordings. Check audio levels.
- Export and test. Export as MP4 H.264 1080p. Play the full video on a screen similar in size to the venue display before the service.
Files to bring to the venue:
- MP4 file on USB drive (two copies on separate drives)
- Laptop with HDMI adapter
- Editable project file as a backup
- Name and contact for the venue's AV staff
Finish your final export at least 24–48 hours before the service. Last-minute edits under pressure introduce errors that are hard to catch.
What should you put at the end of a memorial slideshow?
The closing slide is the last thing the room sees. It deserves as much thought as the opening.
A strong closing card typically includes:
- A hero portrait (the best, most recognizable photo of the person)
- Full name, birth year, and death year
- A short dedication line (1–7 words)
- Optional: service information, a charity donation link, or a family website
Sample dedication phrasings:
- "In loving memory"
- "Forever in our hearts"
- "With love from the family"
- A short quote the person actually said or loved
- Their name alone, in a clean font, held for 8–10 seconds
Keep the closing slide on screen for at least 8 seconds. Fading to black rather than cutting abruptly gives the room a moment to breathe before the next part of the service begins.
For a reception, consider looping the full slideshow or creating a separate credits sequence that names contributors and thanks attendees. This gives people who arrived late a chance to see the tribute and keeps the screen active during the gathering.
Why does the deceased's preserved voice change a tribute video?
A photo shows a face. A voice brings a person back into the room.
Memorial professionals consistently note that including a recorded voice, whether from a voicemail, a home video, or a guided interview, creates an intimacy that images alone cannot achieve. Even a 15-second clip of someone laughing or telling a story can shift the entire emotional experience for everyone watching.
Practical integration tips:
- Place voice clips at the opening, at chapter transitions, or just before the final closing image.
- Keep individual clips under 20–30 seconds for a service-length edit.
- Fade music down before the clip starts and bring it back up slowly afterward.
Privacy and consent:
Before including a voice recording in a shared or published video, confirm that immediate family members are comfortable with it. If you are using voice cloning technology, platform-specific consent requirements apply and should be reviewed before any public sharing.
Senarra is built specifically for this kind of preservation. It captures guided conversations in a person's authentic voice, stores voicemails and recorded interviews, and makes those audio memories accessible whenever a family needs them, whether for a slideshow, a keepsake archive, or simply to hear a familiar voice again. For families who want to capture an aging parent's voice and stories before a loss, starting that process early makes the tribute far richer.
Pro Tip: If you have no existing recordings, ask family members to record a short spoken memory on their phone during the photo-gathering phase. Even a 30-second story told in someone's own words adds texture that no caption can match.
Final testing checklist before the service
Technical failures during a memorial service are avoidable. This checklist covers the most common ones.
At least 24 hours before the service:
- Play the full video on the venue's actual equipment, not just your laptop. What looks fine on a laptop screen can reveal aspect-ratio, contrast, or text-size problems on a projector.
- Check that audio levels are audible in the room at the expected volume setting.
- Confirm the aspect ratio (16:9 for most modern projectors and screens).
- Verify that all captions and text are legible from the back of the room. Use a minimum 36pt font for titles; avoid thin, ornate, or script fonts on projected slides.
Files and backups:
- MP4 H.264 1080p on at least two USB drives.
- Laptop with the editable project file and an HDMI adapter.
- Confirm the venue's preferred playback method (USB, HDMI from laptop, or their own system).
- Have the AV contact's phone number saved.
Final visual check:
- No spelling errors in names, dates, or dedication lines.
- Opening and closing slides hold for at least 6–8 seconds.
- Music fades in and out cleanly; no abrupt cuts.
- All transitions are soft crossfades, no flashy effects.
Making it meaningful, not perfect
The families who create the most memorable tributes are rarely the ones with the best equipment. They are the ones who chose honest photos, included a voice clip no one expected, and asked three relatives to contribute their favorite memory.
Technical polish matters up to a point. After that, what the room feels is determined by the choices you made about what to include, not how smoothly the transitions run. Give yourself permission to grieve during the process. Ask for help sorting photos. Let a sibling pick the closing song. The collaboration itself becomes part of the tribute.
Senarra helps you preserve the voice behind the slideshow
The photos in a memorial slideshow capture moments. The voice behind them captures the person.
Senarra is a memory-preservation platform built for families who want more than a photo archive. It records guided conversations in a loved one's authentic voice, imports and transcribes voicemails, and stores audio memories in a format families can access whenever they need them, including when building a tribute video.
For a DIY slideshow, you can pull voice clips directly from Senarra's archive and drop them into any of the tools covered above. For families who want a longer-term keepsake beyond the service edit, Senarra's memory preservation features include family collaboration, secure sharing, and animated video memories. A 14-day free trial is available through the App Store. If you are ready to start preserving the voice behind the memories, visit Senarra to begin.
Sources
These resources offer templates, how-to guidance, and music options for building a memorial slideshow:
- How to Make a Funeral Slideshow: Templates and Tips (2026) | Tribute
- How to Make a Funeral Slideshow (Animoto blog)
- Memorial Slideshow Ideas: 50+ Templates + Music | Beyond Memories